2013년 6월 26일 수요일

Soft keyboard bug.

android(4.1.2)에서 USB Keyboard를 연결하고 Soft keyboard를 사용하기 위해 Physical Keyboard turn off 하면 한번 software keyboard가 동작하고 물리적 키보드를 off하여도 안되고 재부팅 해도 안되네요.안드로이드 버그 인듯 한데 재부팅해도 안되는 건 좀 심각한 문제 인 듯 합니다.

http://comments.gmane.org/gmane.comp.handhelds.android.devel/219858

1. connect usb keyboard.
2. physical keyboard turn off.
3. run soft keyboard and It works only one time.
4. set physical keyboard.
5. physical keyboard turn off.
6. does not work soft keyboard never when usb keyboard is connected.

해결책은 언어를 바꾸고 바로 Default를 선택하면 나오는 화면에서 바꿀 수 있네요.


I found a solution.Change Language and just select Default item of "KEYBOARD & INPUT METHODS" menu. and you can change state of Hardware(Physical keyboard) on/off.


1. click "Language & input"

2. click "Default"
3. Change state of Hardware(Physical keyboard) on/off.


fix this file
frameworks/base/packages/SystemUI/src/com/android/systemui/statusbar/tablet/InputMethodsPanel.java


 37 import android.view.inputmethod.InputMethodSubtype;
 38 import android.widget.CompoundButton;
 39 import android.widget.CompoundButton.OnCheckedChangeListener;
 40 import android.widget.ImageView;


141     @Override
142     public void onFinishInflate() {
143         mInputMethodMenuList = (LinearLayout) findViewById(R.id.input_method_menu_list);
144         mHardKeyboardSection = (LinearLayout) findViewById(R.id.hard_keyboard_section);
145         mHardKeyboardSwitch = (Switch) findViewById(R.id.hard_keyboard_switch);
146         mHardKeyboardSwitch.setOnCheckedChangeListener(
147             new OnCheckedChangeListener() {
148             @Override
149             public void onCheckedChanged(CompoundButton buttonView, boolean isChecked) {
150                 updateHardKeyboardEnabled();
151             }
152         });
153         mConfigureImeShortcut = findViewById(R.id.ime_settings_shortcut);
154         mConfigureImeShortcut.setOnClickListener(this);
155         // TODO: If configurations for IME are not changed, do not update
156         // by checking onConfigurationChanged.
157         updateUiElements();
158     }


2013년 6월 20일 목요일

HDMI screen rotation issue for ODROID(Exynos4412)

for Exynos4412(mali)

1080P(Full HD)

Tumblr.


720P -> enable Portrait HDMI Screen


1080P -> not allow Portrait HDMI Screen.


device/samsung/exynos4/libhdmi/libhdmiservice/SecTVOutService.cpp


291     void SecTVOutService::setHdmiRotate(uint32_t rotVal, uint32_t hwcLayer)
292     {
293         //codewalker
294         // 1080p is spec out.
295         if (mLCD_height == 1080)
296             return;

2013년 6월 19일 수요일

ODROID - Android Beta 1.8.0

1. Include XBox Controller kl, kcm.
2. Enable Netflix service.
3. Fix 1080P HDMI rotation issue.
4. If mouse.right.click property set "back", Mouse right click act back button(esc key).
5. If ro.sf.hwrotation is set, It effect rotation of HDMI Screen.
6. Fix not to root.
7. Mount USB Mass Storage automatically. (http://forum.odroid.com/viewtopic.php?f=14&t=1906&p=14016#p14016)
8. remove ODROID, FileManager, Ternmial app. add jackpal AndroidTerm, Ultra Explorer app.

https://www.dropbox.com/sh/d5zfj5z3mo0rohj/g7utJRzedt

Add init.d support to ODROID

Add init.d support to ODROID

create sysinit script device/hardkernel/proprietary/bin/sysinit

#!/system/bin/sh

export PATH=/sbin:/system/sbin:/system/bin:/system/xbin
/system/bin/logwrapper /system/xbin/run-parts /system/etc/init.d


edit device.mk

# init.d support
PRODUCT_COPY_FILES += \
     device/hardkernel/proprietary/bin/sysinit:system/bin/sysinit


edit init.odroidu2.rc

on boot
# Run sysinit
    start sysinit

...

# sysinit (/system/etc/init.d)
service sysinit /system/bin/sysinit
    user root
    oneshot


build android

why support init.d?

Must do 98netflix script for Netflix service.

2013년 6월 13일 목요일

OpenCV test on ODROID-X2.

Download OpenCV test app

http://sourceforge.net/projects/opencvlibrary/files/opencv-android/2.4.5/OpenCV-2.4.5-android-sdk.zip/download

import projects to eclipse.

OpenCV Library - 2.4.5
OpenCV Sample - face-detection

add NDKROOT variable

http://stackoverflow.com/questions/16328637/building-opencv-2-4-5-in-android-adt-ndk-build-not-found-in-path

fix preview parameters

JavaCameraView.java

params.setPreviewFormat(ImageFormat.NV21);
Log.d(TAG, "Set preview size to " + Integer.valueOf(640) + "x" + Integer.valueOf(480));
params.setPreviewSize((int)640, (int)480);
//Log.d(TAG, "Set preview size to " + Integer.valueOf((int)frameSize.width) + "x" + Integer.valueOf((int)frameSize.height));
//params.setPreviewSize((int)frameSize.width, (int)frameSize.height);


for MIPI Camera.

//params.setPreviewFormat(ImageFormat.NV21);
params.setPreviewFormat(ImageFormat.NV16);
Log.d(TAG, "Set preview size to " + Integer.valueOf(640) + "x" + Integer.valueOf(480));
params.setPreviewSize((int)640, (int)480);


2013년 6월 4일 화요일

How to Use WebCam(UVC) for ODROID-X/X2

1. Module UVC driver


--- V4L USB devices
<M>   USB Video Class (UVC)
[ ]     UVC input events device support
<M>   GSPCA based webcams  --->

2. make and copy zImage
$cp arch/arm/boot/zImage android/device/hardkernel/odroidx[x2]/kernel_sdmmc[emmc]

3. copy uvcvideo.ko
$cp driver/media/video/uvcvideo.ko android/device/hardkernel/proprietary/bin/

4. copy driver into "/system/lib/modules/" directory.
device.mk
#
# UVC Module
#
PRODUCT_COPY_FILES += \
    device/hardkernel/proprietary/bin/uvcvideo_x.ko:system/lib/modules/uvcvideo.ko

5. add service for module insert.
init.odroidx[x2][_realtek].rc

service uvc_usb_module /system/bin/insmod /system/lib/modules/uvcvideo.ko
    class core
    user root
    group root
    oneshot

6. select WebCam Camera library.
BoardConfig.mk
BOARD_CAMERA    := odroidx    //MIPI cameara
BOARD_CAMERA    := odroidu    //UVC

7. android build


2013년 5월 31일 금요일

Boot from system partition instead ramdisk for ODROID

mount eMMC or SDCard on PC.


Disk /dev/sde: 15.8 GB, 15758000128 bytes
255 heads, 63 sectors/track, 1915 cylinders, total 30777344 sectors
Units = sectors of 1 * 512 = 512 bytes
Sector size (logical/physical): 512 bytes / 512 bytes
I/O size (minimum/optimal): 512 bytes / 512 bytes
Disk identifier: 0x00000000

   Device Boot      Start         End      Blocks   Id  System
/dev/sde1         6684672    30646271    11980800    c  W95 FAT32 (LBA)
/dev/sde2          131072     2228223     1048576   83  Linux
/dev/sde3         2228224     6422527     2097152   83  Linux
/dev/sde4         6422528     6684671      131072   83  Linux

Partition table entries are not in disk order
[~/projects/ssd/JellyBean/out/target/product/odroidx2]$

#mount system partition

[~/projects/ssd/JellyBean/out/target/product/odroidx2]$ sudo mount /dev/sde2 /media/microSD/

# copy ramdisk fs.

[~/projects/ssd/JellyBean/out/target/product/odroidx2]$ sudo cp -a root/ /media/microSD/

# change permissions

[~/projects/ssd/JellyBean/out/target/product/odroidx2]$ sudo chmod 644 /media/microSD/init.*
[~/projects/ssd/JellyBean/out/target/product/odroidx2]$ sudo chmod 644 /media/microSD/build.prop

and ODROID power up...

make boot.scr

edit boot.ini


  1 setenv v_out        "hdmi"
  2 setenv fake_fb      "false"
  3 setenv fb_x_res     "1360"
  4 setenv fb_y_res     "768"
  5 setenv hdmi_phy_res "1080"
  6 setenv led_blink    "1"
  7 setenv bootcmd      "movi read kernel 0 40008000;movi read rootfs 0 41000000 100000;bootm 40008000 41000000"
  8 setenv bootargs     "root=/dev/mmcblk0p2 ro rootfstype=ext4 init=/init rootdelay=1 console=/dev/ttySAC1,115200n8 androidboot.console=ttySAC1 v_out=${v_out} fake_fb=${fake_fb} fb_x_res=${fb_x_res} fb_y_res=${    fb_y_res} hdmi_phy_res=${hdmi_phy_res} led_blink=${led_blink}"
  9 boot


$./make_boot_scr.sh

$adb push boot.scr /sdcard/

$adb sync

$adb reboot

boot from system partition.


booting log


[    0.000000] sclk_fimd: source is xusbxti (1), rate is 1500000
[    0.000000] sclk_mfc: source is mout_mfc0 (0), rate is 55000000
[    0.000000] sclk_g3d: source is mout_g3d0 (0), rate is 55000000
[    0.000000] sclk_pwi: source is xusbxti (1), rate is 1500000
[    0.000000] PERCPU: Embedded 7 pages/cpu @c1af8000 s7008 r8192 d13472 u32768
[    0.000000] Built 1 zonelists in Zone order, mobility grouping on.  Total pages: 519938
[    0.000000] Kernel command line: console=ttySAC1,115200n8 androidboot.console=ttySAC1 mem=2047M root=/dev/mmcblk0p2 ro rootfstype=ext4 init=/init rootdelay=1 console=/dev/ttySAC1,115200n8 androidboot.console=1
[    0.000000] PID hash table entries: 4096 (order: 2, 16384 bytes)
[    0.000000] Dentry cache hash table entries: 131072 (order: 7, 524288 bytes)
[    0.000000] Inode-cache hash table entries: 65536 (order: 6, 262144 bytes)
[    0.000000] Memory: 2047MB = 2047MB total
[    0.000000] Memory: 1695464k/1695464k available, 400664k reserved, 1342464K highmem
[    0.000000] Virtual kernel memory layout:
[    0.000000]     vector  : 0xffff0000 - 0xffff1000   (   4 kB)


2013년 5월 30일 목요일

Update ODROID-X2 firmware and install GMS.

1. Download Android_Beta 1.6 firmware

http://com.odroid.com/sigong/nf_file_board/nfile_board_view.php?keyword=&tag=&bid=182

http://dn.odroid.com/Android_Beta_1.6/X2/emmc_installer_for_odroidx2.zip

2. write to SD Card.
sudo dd if=./emmc_installer_for_odroidx2.img of=/dev/sdx

or

ImageWriter

3. write to eMMC

4. success to install Android Beta 1.6 version


5. Download GMS apps.

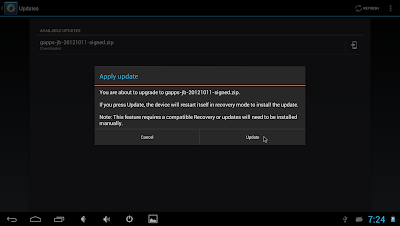
Must download gapps-jb-20121011-signed.zip,


6. Download Astor File Manager apk and install


7. Make updater directory and move gapps-jb-20121011-singed.zip there.


8. Settings -> About tablet -> ODROID Update.


9. Update


10. Sing in  Google Account.


11. Download Android Beta 1.7 firmware


12. move odroidx2-ota-eng.codewalker.zip to updater directory.


13. Update


13. Reinstall GMS apps

go back step 7.

2013년 5월 21일 화요일

ethernet으로 Wi-Fi 연결 fake


ODROID에 Ethernet port가 있고 기본적으로 dhcp가 가능한 회선에 연결하면 Wi-Fi  연결되어 있지 않아도 인터넷이 가능합니다.

하지면 몇몇 app들은 Mobile Network 또는 Wi-Fi  연결만을 체크하도록 되어 있어서 실행이 안되는 경우가 있습니다.

Ethernet 연결을 Wi-Fi 연결로 사용하여 android에서 Wi-Fi  연결된것 처럼 만들고 싶은데 관련 자료를 못찾겠네요.

아래의 그림과 같이 android는 wlan0가 wpa_supplicant와 연결되어 있습니다. 여기서  wlan0에 eth0를 어떻게 연결할지 생각되는 시나리오 들입니다.

wlan0 -> wpa_supplicant->android

 ^                       ^
  | ?(route)        | ( wpa_supplicant -ieth0 -Dwired)?
eth0    --------->           

1. wpa_supplicant -ieth0 -Dwired 옵션으로 ethernet을 연결
- 단 wpa_supplicant가 두개가 존재해야 하고 서비스 역시 두개가 되어야 한네요.
(wpa_supplicnat -iwlan -Dwext)
- "-Dwired"가 동작하기 위해 wpa_supplicant가 BOARD_WPA_SUPPLICANT_DRIVER := WIRED로 동작 확인이 먼저 일 듯 합니다.


2. eth0을 route하여 wlan0에 연결 
- 하지만 wpa_supplicant 때문에 SSID등 연결된 상태로 만들기가 가능 할지 모르겠네요.

3. reverse tethering
- 이건 pc의 인터넷 연결을 USB(adb)로 스마트폰으로 연결해주는 기술인데 자세한 자료는 없고 howto만 보이네요. usb tethering apk 소스가 필요할 듯 합니다.
- 이건 기본적으로 eth0로 네트워크가 연결되어 있고 Wi-Fi 연결로 속일 수 없어서 안 될것 같은데 몇몇 동영상을 찾아 보면 3G Network 연결로 만드는 듯 하여 Wi-Fi가 아니라 Mobile Network로 연결된다면 가능할 것 같습니다.

MK802 란 모델이 위에 설명한 방법으로 Network이 구성이 된다고 합니다.


아래 주소에서 reverse tethering 소스를 구할 수 있습니다.
https://code.google.com/p/android-reverse-tethering/source/checkout


2013년 5월 17일 금요일

Pinch to zoom with mouse wheel.

Pinch to Zoom with mouse wheel.


You can test it.
download libinput.so here.


$adb remount
$adb push libinput.so /system/lib/
$adb shell sync
$adb shell reboot

settings -> Developer options -> Show touches(check)

2013년 5월 13일 월요일

adb shell sendevent로 pinch zoom in/out

adb shell sendevent로 android에 input event를 가상으로 보낼 수 있습니다.

http://toors.tistory.com/entry/android-touch-move-event-%EC%83%9D%EC%84%B1

위에 링크처럼 하면 move와 같이 single  touch event는 만들 수 있습니다.

pinch zoom in/out과 같은 multi touch event도 만들 수 있습니다.

getevent에서 odroidx-ts가 touch screen device이고 node는 event1입니다.

# getevent                                                    
add device 1: /dev/input/event0                                              
  name:     "odroid-keypad"                                                  
add device 2: /dev/input/event2                                              
  name:     "Microsoft Microsoft 3-Button Mouse with IntelliEye(TM)"          
add device 3: /dev/input/event1                                              
  name:     "odroidx-ts"


저의 시스템에서 touch의 노드는 /dev/input/event3입니다.

sh로 만드실 경우 system을 없애고 "adb shell sendevent"로 고치시면 됩니다.


//첫번째 pointer의 ABS_MT_TRACKING_ID를 1로 설정한다.
system("sendevent /dev/input/event1 3 57 1");
system("sendevent /dev/input/event1 3 53 %d", X1);
system("sendevent /dev/input/event1 3 54 %d", Y1);
//ABS_MT_PRESSURE 8정도의 값을 보내서 press 되었다고 알려 줍니다.
system("sendevent /dev/input/event1 3 58 8");
//한 pointer에 대한 EV_SYN, SYN_REPORT를 보낸다.
system("sendevent /dev/input/event3 0 0 0");


//두번째 pointer 입력 전에 ABS_MT_SLOT을 보낸다.
system("sendevent /dev/input/event3 3 47 1");


//두번째 pointer의 위치를 정한다.
X1 = X2 + 50;
Y2 = Y2 + 50;


//두번째 pointer
//첫번째 pointer의 ABS_MT_TRACKING_ID를 2로 설정한다.
system("sendevent /dev/input/event1 3 57 2");
system("sendevent /dev/input/event1 3 53 %d", X2);
system("sendevent /dev/input/event1 3 54 %d", Y2);  
system("sendevent /dev/input/event1 3 58 8");
system("sendevent /dev/input/event1 0 0 0");


//여기서 ABS_MT_POSITION_X(53), ABS_MT_POSITION_Y(54), 그리고 SYN_REPORT를 한 묶음으로 이동하고 싶은 만큼 반복한다.
system("sendevent /dev/input/event1 3 53 %d", X2 += 20);
system("sendevent /dev/input/event1 3 54 %d", Y2 += 20);
system("sendevent /dev/input/event1 0 0 0");


//첫번째 pointer의 ABS_MT_TR두ACKING_ID를 -1을 초기화 한다.
system("sendevent /dev/input/event1 3 57 -1");
system("sendevent /dev/input/event1 0 0 0");
//ABS_MT_SLOT(47)은 0,1로 번갈아 입력된다. 앞에서 1로 보냈으니 0으로 보낸다.
system("sendevent /dev/input/event1 3 47 0");
//두번째 pointer의 ABS_MT_TRACKING_ID를 -1을 초기화 한다.
system("sendevent /dev/input/event1 3 57 -1");
system("sendevent /dev/input/event1 0 0 0");

--------------------------------------------------------------------------------------------------

bionic/libc/kernel/common/linux/input.h에 define 되어 있습니다.

#define EV_ABS 0x03
#define ABS_MT_POSITION_X 0x35  -> 57(십진수)

#define ABS_MT_POSITION_Y 0x36 - > 58(십진수)
#define ABS_MT_PRESSURE 0x3a


아래와 같이 getevent -l 로 event를 확인 할 수 있는데 Multi touch시에 event가 어떻게 들어 오는지 확인하여 pinch zoom을 구현해 봤습니다.


$ adb shell getevent -l
add device 1: /dev/input/event0
  name:     "odroid-keypad"
add device 2: /dev/input/event2
  name:     "Microsoft Microsoft 3-Button Mouse with IntelliEye(TM)"
add device 3: /dev/input/event1
  name:     "odroidx-ts"
/dev/input/event2: EV_REL       REL_X                ffffffff          
/dev/input/event2: EV_REL       REL_Y                00000001          
/dev/input/event2: EV_SYN       SYN_REPORT           00000000          
/dev/input/event2: EV_REL       REL_X                ffffffff          
/dev/input/event2: EV_REL       REL_Y                00000002          
/dev/input/event2: EV_SYN       SYN_REPORT           00000000          
/dev/input/event2: EV_REL       REL_X                ffffffff          
/dev/input/event2: EV_REL       REL_Y                00000002          
/dev/input/event2: EV_SYN       SYN_REPORT           00000000          
/dev/input/event2: EV_REL       REL_X                ffffffff          
/dev/input/event2: EV_REL       REL_Y                00000002          
/dev/input/event2: EV_SYN       SYN_REPORT           00000000          
/dev/input/event2: EV_REL       REL_X                ffffffff          
/dev/input/event2: EV_REL       REL_Y                00000002          
/dev/input/event2: EV_SYN       SYN_REPORT           00000000          
/dev/input/event2: EV_REL       REL_X                ffffffff          
/dev/input/event2: EV_REL       REL_Y                00000002  


2013년 4월 15일 월요일

Recovery for ODROID

I success to port recovery function of CM to ODROID-X2 base Android beta 1.5(android-4.1.2_r1). 
well working.


now enable recovery UI on LCD.


2013년 4월 2일 화요일

CM-10.1-M2 for ODROID-U2

1. Support Ethernet. (static IP not yet)
2. Mouse right button click act like back Button.
3. add PowerOff widget.


working to enable Volume Up/Down, Screenshot, Power Button.


https://www.dropbox.com/s/sy3lkbo8fr48xla/cm-10.1-20130404-UNOFFICIAL-odroidu2.zip

build and install CyanogenMod for ODOID-U2

http://wiki.cyanogenmod.org/w/Build_for_odroidu2

소스를 git로부터 가져 옵니다.
get source from git.

$repo init -u git://github.com/CyanogenMod/android.git -b cm-10.1

$repo sync

tag를 확인해 보면 M2가 있습니다. M2로 checkout합니다.


[~/projects/cm-10.1/frameworks/base]$ git tag
cm-10.1-M1
cm-10.1-M2

$repo forall -c git chechout cm-10.1-M2

$cd vendor/cm
$./get-prebuilts
$cd ../..

$source build/envsetup.sh
$breakfast odroidu2

including vendor/cm/vendorsetup.sh
ls: cannot access device/*/odroidu2/cm.mk: No such file or directory
build/core/product_config.mk:234: *** Cannot locate config makefile for product "cm_odroidu2".  Stop.
Device odroidu2 not found. Attempting to retrieve device repository from CyanogenMod Github (http://github.com/CyanogenMod).
Found repository: android_device_hardkernel_odroidu2
Default revision: cm-10.1
Checking branch info
Adding dependency: CyanogenMod/android_device_hardkernel_odroidu2 -> device/hardkernel/odroidu2
Using default branch for android_device_hardkernel_odroidu2
Syncing repository to retrieve project.
remote: Counting objects: 338, done.
remote: Compressing objects: 100% (148/148), done.
remote: Total 338 (delta 147), reused 320 (delta 129)
Receiving objects: 100% (338/338), 2.87 MiB | 153 KiB/s, done.
Resolving deltas: 100% (147/147), done.
From git://github.com/CyanogenMod/android_device_hardkernel_odroidu2
 * [new branch]      cm-10.1    -> github/cm-10.1
 * [new tag]         cm-10.1-M2 -> cm-10.1-M2
 * [new tag]         cm-10.1-M3 -> cm-10.1-M3
 * [new tag]         cm-10.1.0-RC1 -> cm-10.1.0-RC1
 * [new tag]         cm-10.1.0-RC2 -> cm-10.1.0-RC2
 * [new tag]         cm-10.1.0-RC3 -> cm-10.1.0-RC3
 * [new tag]         cm-10.1.0-RC4 -> cm-10.1.0-RC4
 * [new tag]         cm-10.1.0-RC5 -> cm-10.1.0-RC5
From git://github.com/CyanogenMod/android_device_hardkernel_odroidu2
 * [new tag]         cm-10.1-M1 -> cm-10.1-M1
Fetching projects: 100% (1/1), done.

Repository synced!
Looking for dependencies
Adding dependencies to manifest
Adding dependency: CyanogenMod/android_device_hardkernel_samsung -> device/hardkernel/samsung
Using default branch for android_device_hardkernel_samsung
Adding dependency: CyanogenMod/android_hardware_realtek -> hardware/realtek
Using default branch for android_hardware_realtek
Adding dependency: CyanogenMod/hardkernel-kernel-4412 -> kernel/hardkernel/4412-common
Using default branch for hardkernel-kernel-4412
Syncing dependencies
remote: Counting objects: 673, done.
remote: Counting objects: 19, done.
remote: Compressing objects: 100% (15/15), done.
remote: Compressing objects: 100% (315/315), done.
remote: Total 19 (delta 0), reused 19 (delta 0)
Unpacking objects: 100% (19/19), done.
From git://github.com/CyanogenMod/android_hardware_realtek
 * [new branch]      cm-10.1    -> github/cm-10.1
 * [new tag]         cm-10.1-M1 -> cm-10.1-M1
 * [new tag]         cm-10.1-M2 -> cm-10.1-M2
 * [new tag]         cm-10.1-M3 -> cm-10.1-M3
 * [new tag]         cm-10.1.0-RC1 -> cm-10.1.0-RC1
 * [new tag]         cm-10.1.0-RC2 -> cm-10.1.0-RC2
 * [new tag]         cm-10.1.0-RC3 -> cm-10.1.0-RC3
 * [new tag]         cm-10.1.0-RC4 -> cm-10.1.0-RC4
 * [new tag]         cm-10.1.0-RC5 -> cm-10.1.0-RC5
remote: Total 673 (delta 326), reused 673 (delta 326)
Receiving objects: 100% (673/673), 3.95 MiB | 94 KiB/s, done.
Resolving deltas: 100% (326/326), done.
From git://github.com/CyanogenMod/android_device_hardkernel_samsung
 * [new branch]      cm-10.1    -> github/cm-10.1
 * [new tag]         cm-10.1-M1 -> cm-10.1-M1
 * [new tag]         cm-10.1-M2 -> cm-10.1-M2
 * [new tag]         cm-10.1-M3 -> cm-10.1-M3
 * [new tag]         cm-10.1-MR1 -> cm-10.1-MR1
 * [new tag]         cm-10.1.0-RC1 -> cm-10.1.0-RC1
 * [new tag]         cm-10.1.0-RC2 -> cm-10.1.0-RC2
 * [new tag]         cm-10.1.0-RC3 -> cm-10.1.0-RC3
 * [new tag]         cm-10.1.0-RC4 -> cm-10.1.0-RC4
 * [new tag]         cm-10.1.0-RC5 -> cm-10.1.0-RC5
remote: Counting objects: 2114829, done.
remote: Compressing objects: 100% (330292/330292), done.
Receiving objects:   2% (43873/2114829), 16.79 MiB | 131 KiB/s  


odroid-u2를 켜고 device/hardkernel/odroidu2/extract-files.sh을 실행

Turn on odroid-u2 and run shell script.

$sh ./extrac-files.sh

And build.

$source build/envsetup.sh
$breakfast odroidu2
$croot
$brunch odroidu2


http://wiki.cyanogenmod.org/w/Install_CM_for_odroidu2

여기서 CM 복구 이미지를 받습니다.
Download CM Recovery(bootstrap) Image.

http://cmw.cmfs.me/emmc/bootstrap-cm-10.1-20130105-odroidu2.zip

압축을 풀고 eMMC를 PC에 연결 합니다.
Unzip and connect eMMC Module to PC.

sh ./install-emmc.sh /dev/sd[x] 와 같이 mount된 eMMC의 sd[x]를 넣어 줍니다.


[~/Downloads/cyanogenMod]$ sh ./install-emmc.sh /dev/sdd
/dev/sdd reader is identified.
Fusing kernel
2887260+0 records in
2887260+0 records out
2887260 bytes (2.9 MB) copied, 2.15934 s, 1.3 MB/s
Fusing root filesystem
185013+0 records in
185013+0 records out
185013 bytes (185 kB) copied, 0.203257 s, 910 kB/s
Fusing main system partition
500+0 records in
500+0 records out
524288000 bytes (524 MB) copied, 37.0214 s, 14.2 MB/s


eMMC를 다시 PC에 연결 후 fat 영역에 "cmupdater" 란 폴더를 만들고 cm-10.1-xxxxxxxx-UNOFFICIAL-odroidu2.zip 앞에서 build된 zip 파일을 넣으면 아래와 같이 보이고 설치가 가능합니다.

finished fusing, reconnect eMMC module.

make directory "cmupdater" into fat partition.

copy cm-10.1-xxxxxxxx-UNOFFICIAL-odroidu2.zip.


2013년 3월 25일 월요일

GMS apps install without PC for ODROID

Connect USB Keyboard.

1. Download GAPPS from Broswer


http://goo.im/gapps/


ICS

gapps-ics-20120429-signed.zip

JB

gapps-jb-20121011-signed.zip

2. Run File Explorer


3. Unzip by File Explorer app.


4. Run Terminal 


5. get Root

#su


6. remount /system patition to rw

#mount -o rw,remount /system


root@android:/sdcard/Download # mount                                           
rootfs / rootfs ro,relatime 0 0                                                 
tmpfs /dev tmpfs rw,nosuid,relatime,mode=755 0 0                                
devpts /dev/pts devpts rw,relatime,mode=600 0 0                                 
proc /proc proc rw,relatime 0 0                                                 
sysfs /sys sysfs rw,relatime 0 0                                                
none /acct cgroup rw,relatime,cpuacct 0 0                                       
tmpfs /mnt/asec tmpfs rw,relatime,mode=755,gid=1000 0 0                         
tmpfs /mnt/obb tmpfs rw,relatime,mode=755,gid=1000 0 0                          
none /dev/cpuctl cgroup rw,relatime,cpu 0 0                                     
/dev/block/mmcblk0p2 /system ext4 rw,relatime,barrier=1,data=ordered 0 0        
/dev/block/mmcblk0p3 /data ext4 rw,nosuid,nodev,noatime,barrier=1,nodelalloc,da0
/dev/block/mmcblk0p4 /cache ext4 rw,nosuid,nodev,noatime,barrier=1,nomblk_io_su0
none /proc/bus/usb usbfs rw,relatime,devmode=666 0 0                            
/dev/block/vold/179:1 /mnt/sdcard vfat rw,dirsync,nosuid,nodev,noexec,relatime,0
/dev/block/vold/179:1 /mnt/secure/asec vfat rw,dirsync,nosuid,nodev,noexec,rela0
tmpfs /mnt/sdcard/.android_secure tmpfs ro,relatime,size=0k,mode=000 0 0        
root@android:/sdcard/Download # 

7. cp gapps files


/system/bin/busybox cp -rv /sdcard/Download/gapp-jb-20121011-signed/system/* /system/


8. change permissions


#cd /system/app
#chmod 644 *
#sync
#reboot

9. finish


2013년 1월 28일 월요일

Makefile에서 "-=" 문제

android 4.1.1에서 busybox가 컴파일이 안된다.
문제는 -fno-strict-volatile-bitfields다.
4.2.1에서는 컴파일이 되는데 4.1.1에서는 안된다.

build/core/combo/TARGET_linux-arm.mk


120 # by turning off the builtin sin function.                          
121 ifneq ($(filter 4.6.%, $(shell $(TARGET_CC) --version)),)          
122 TARGET_GLOBAL_CFLAGS += -Wno-unused-but-set-variable -fno-builtin-sin \
123             -fno-strict-volatile-bitfields                                                          
124 endif                                                                  
125        


그래서 저 옵션만 끄면 되것 같아서 아래와 같이 해 보았다.

TARGET_GLOBAL_CFLAGS -= -fno-strict-volatile-bitfields

물론 -=가 될줄 알았는데 안된다.

그래서 할 수 없이 TARGET_GLOBAL_CFLAGS에서 -fno-strict-volatile-bitfields를 없애고 다른 변수를 선언하기로 했다.

TARGET_GLOBAL_CFLAGS2 := $(shell echo $(TARGET_GLOBAL_CFLAGS) | sed 's/-fno-strict-volatile-bitfields/ /g')