2013년 6월 13일 목요일

OpenCV test on ODROID-X2.

Download OpenCV test app

http://sourceforge.net/projects/opencvlibrary/files/opencv-android/2.4.5/OpenCV-2.4.5-android-sdk.zip/download

import projects to eclipse.

OpenCV Library - 2.4.5
OpenCV Sample - face-detection

add NDKROOT variable

http://stackoverflow.com/questions/16328637/building-opencv-2-4-5-in-android-adt-ndk-build-not-found-in-path

fix preview parameters

JavaCameraView.java

params.setPreviewFormat(ImageFormat.NV21);
Log.d(TAG, "Set preview size to " + Integer.valueOf(640) + "x" + Integer.valueOf(480));
params.setPreviewSize((int)640, (int)480);
//Log.d(TAG, "Set preview size to " + Integer.valueOf((int)frameSize.width) + "x" + Integer.valueOf((int)frameSize.height));
//params.setPreviewSize((int)frameSize.width, (int)frameSize.height);


for MIPI Camera.

//params.setPreviewFormat(ImageFormat.NV21);
params.setPreviewFormat(ImageFormat.NV16);
Log.d(TAG, "Set preview size to " + Integer.valueOf(640) + "x" + Integer.valueOf(480));
params.setPreviewSize((int)640, (int)480);


2013년 6월 4일 화요일

How to Use WebCam(UVC) for ODROID-X/X2

1. Module UVC driver


--- V4L USB devices
<M>   USB Video Class (UVC)
[ ]     UVC input events device support
<M>   GSPCA based webcams  --->

2. make and copy zImage
$cp arch/arm/boot/zImage android/device/hardkernel/odroidx[x2]/kernel_sdmmc[emmc]

3. copy uvcvideo.ko
$cp driver/media/video/uvcvideo.ko android/device/hardkernel/proprietary/bin/

4. copy driver into "/system/lib/modules/" directory.
device.mk
#
# UVC Module
#
PRODUCT_COPY_FILES += \
    device/hardkernel/proprietary/bin/uvcvideo_x.ko:system/lib/modules/uvcvideo.ko

5. add service for module insert.
init.odroidx[x2][_realtek].rc

service uvc_usb_module /system/bin/insmod /system/lib/modules/uvcvideo.ko
    class core
    user root
    group root
    oneshot

6. select WebCam Camera library.
BoardConfig.mk
BOARD_CAMERA    := odroidx    //MIPI cameara
BOARD_CAMERA    := odroidu    //UVC

7. android build


2013년 5월 31일 금요일

Boot from system partition instead ramdisk for ODROID

mount eMMC or SDCard on PC.


Disk /dev/sde: 15.8 GB, 15758000128 bytes
255 heads, 63 sectors/track, 1915 cylinders, total 30777344 sectors
Units = sectors of 1 * 512 = 512 bytes
Sector size (logical/physical): 512 bytes / 512 bytes
I/O size (minimum/optimal): 512 bytes / 512 bytes
Disk identifier: 0x00000000

   Device Boot      Start         End      Blocks   Id  System
/dev/sde1         6684672    30646271    11980800    c  W95 FAT32 (LBA)
/dev/sde2          131072     2228223     1048576   83  Linux
/dev/sde3         2228224     6422527     2097152   83  Linux
/dev/sde4         6422528     6684671      131072   83  Linux

Partition table entries are not in disk order
[~/projects/ssd/JellyBean/out/target/product/odroidx2]$

#mount system partition

[~/projects/ssd/JellyBean/out/target/product/odroidx2]$ sudo mount /dev/sde2 /media/microSD/

# copy ramdisk fs.

[~/projects/ssd/JellyBean/out/target/product/odroidx2]$ sudo cp -a root/ /media/microSD/

# change permissions

[~/projects/ssd/JellyBean/out/target/product/odroidx2]$ sudo chmod 644 /media/microSD/init.*
[~/projects/ssd/JellyBean/out/target/product/odroidx2]$ sudo chmod 644 /media/microSD/build.prop

and ODROID power up...

make boot.scr

edit boot.ini


  1 setenv v_out        "hdmi"
  2 setenv fake_fb      "false"
  3 setenv fb_x_res     "1360"
  4 setenv fb_y_res     "768"
  5 setenv hdmi_phy_res "1080"
  6 setenv led_blink    "1"
  7 setenv bootcmd      "movi read kernel 0 40008000;movi read rootfs 0 41000000 100000;bootm 40008000 41000000"
  8 setenv bootargs     "root=/dev/mmcblk0p2 ro rootfstype=ext4 init=/init rootdelay=1 console=/dev/ttySAC1,115200n8 androidboot.console=ttySAC1 v_out=${v_out} fake_fb=${fake_fb} fb_x_res=${fb_x_res} fb_y_res=${    fb_y_res} hdmi_phy_res=${hdmi_phy_res} led_blink=${led_blink}"
  9 boot


$./make_boot_scr.sh

$adb push boot.scr /sdcard/

$adb sync

$adb reboot

boot from system partition.


booting log


[    0.000000] sclk_fimd: source is xusbxti (1), rate is 1500000
[    0.000000] sclk_mfc: source is mout_mfc0 (0), rate is 55000000
[    0.000000] sclk_g3d: source is mout_g3d0 (0), rate is 55000000
[    0.000000] sclk_pwi: source is xusbxti (1), rate is 1500000
[    0.000000] PERCPU: Embedded 7 pages/cpu @c1af8000 s7008 r8192 d13472 u32768
[    0.000000] Built 1 zonelists in Zone order, mobility grouping on.  Total pages: 519938
[    0.000000] Kernel command line: console=ttySAC1,115200n8 androidboot.console=ttySAC1 mem=2047M root=/dev/mmcblk0p2 ro rootfstype=ext4 init=/init rootdelay=1 console=/dev/ttySAC1,115200n8 androidboot.console=1
[    0.000000] PID hash table entries: 4096 (order: 2, 16384 bytes)
[    0.000000] Dentry cache hash table entries: 131072 (order: 7, 524288 bytes)
[    0.000000] Inode-cache hash table entries: 65536 (order: 6, 262144 bytes)
[    0.000000] Memory: 2047MB = 2047MB total
[    0.000000] Memory: 1695464k/1695464k available, 400664k reserved, 1342464K highmem
[    0.000000] Virtual kernel memory layout:
[    0.000000]     vector  : 0xffff0000 - 0xffff1000   (   4 kB)


2013년 5월 30일 목요일

Update ODROID-X2 firmware and install GMS.

1. Download Android_Beta 1.6 firmware

http://com.odroid.com/sigong/nf_file_board/nfile_board_view.php?keyword=&tag=&bid=182

http://dn.odroid.com/Android_Beta_1.6/X2/emmc_installer_for_odroidx2.zip

2. write to SD Card.
sudo dd if=./emmc_installer_for_odroidx2.img of=/dev/sdx

or

ImageWriter

3. write to eMMC

4. success to install Android Beta 1.6 version


5. Download GMS apps.

Must download gapps-jb-20121011-signed.zip,


6. Download Astor File Manager apk and install


7. Make updater directory and move gapps-jb-20121011-singed.zip there.


8. Settings -> About tablet -> ODROID Update.


9. Update


10. Sing in  Google Account.


11. Download Android Beta 1.7 firmware


12. move odroidx2-ota-eng.codewalker.zip to updater directory.


13. Update


13. Reinstall GMS apps

go back step 7.

2013년 5월 21일 화요일

ethernet으로 Wi-Fi 연결 fake


ODROID에 Ethernet port가 있고 기본적으로 dhcp가 가능한 회선에 연결하면 Wi-Fi  연결되어 있지 않아도 인터넷이 가능합니다.

하지면 몇몇 app들은 Mobile Network 또는 Wi-Fi  연결만을 체크하도록 되어 있어서 실행이 안되는 경우가 있습니다.

Ethernet 연결을 Wi-Fi 연결로 사용하여 android에서 Wi-Fi  연결된것 처럼 만들고 싶은데 관련 자료를 못찾겠네요.

아래의 그림과 같이 android는 wlan0가 wpa_supplicant와 연결되어 있습니다. 여기서  wlan0에 eth0를 어떻게 연결할지 생각되는 시나리오 들입니다.

wlan0 -> wpa_supplicant->android

 ^                       ^
  | ?(route)        | ( wpa_supplicant -ieth0 -Dwired)?
eth0    --------->           

1. wpa_supplicant -ieth0 -Dwired 옵션으로 ethernet을 연결
- 단 wpa_supplicant가 두개가 존재해야 하고 서비스 역시 두개가 되어야 한네요.
(wpa_supplicnat -iwlan -Dwext)
- "-Dwired"가 동작하기 위해 wpa_supplicant가 BOARD_WPA_SUPPLICANT_DRIVER := WIRED로 동작 확인이 먼저 일 듯 합니다.


2. eth0을 route하여 wlan0에 연결 
- 하지만 wpa_supplicant 때문에 SSID등 연결된 상태로 만들기가 가능 할지 모르겠네요.

3. reverse tethering
- 이건 pc의 인터넷 연결을 USB(adb)로 스마트폰으로 연결해주는 기술인데 자세한 자료는 없고 howto만 보이네요. usb tethering apk 소스가 필요할 듯 합니다.
- 이건 기본적으로 eth0로 네트워크가 연결되어 있고 Wi-Fi 연결로 속일 수 없어서 안 될것 같은데 몇몇 동영상을 찾아 보면 3G Network 연결로 만드는 듯 하여 Wi-Fi가 아니라 Mobile Network로 연결된다면 가능할 것 같습니다.

MK802 란 모델이 위에 설명한 방법으로 Network이 구성이 된다고 합니다.


아래 주소에서 reverse tethering 소스를 구할 수 있습니다.
https://code.google.com/p/android-reverse-tethering/source/checkout


2013년 5월 17일 금요일

Pinch to zoom with mouse wheel.

Pinch to Zoom with mouse wheel.


You can test it.
download libinput.so here.


$adb remount
$adb push libinput.so /system/lib/
$adb shell sync
$adb shell reboot

settings -> Developer options -> Show touches(check)

2013년 5월 13일 월요일

adb shell sendevent로 pinch zoom in/out

adb shell sendevent로 android에 input event를 가상으로 보낼 수 있습니다.

http://toors.tistory.com/entry/android-touch-move-event-%EC%83%9D%EC%84%B1

위에 링크처럼 하면 move와 같이 single  touch event는 만들 수 있습니다.

pinch zoom in/out과 같은 multi touch event도 만들 수 있습니다.

getevent에서 odroidx-ts가 touch screen device이고 node는 event1입니다.

# getevent                                                    
add device 1: /dev/input/event0                                              
  name:     "odroid-keypad"                                                  
add device 2: /dev/input/event2                                              
  name:     "Microsoft Microsoft 3-Button Mouse with IntelliEye(TM)"          
add device 3: /dev/input/event1                                              
  name:     "odroidx-ts"


저의 시스템에서 touch의 노드는 /dev/input/event3입니다.

sh로 만드실 경우 system을 없애고 "adb shell sendevent"로 고치시면 됩니다.


//첫번째 pointer의 ABS_MT_TRACKING_ID를 1로 설정한다.
system("sendevent /dev/input/event1 3 57 1");
system("sendevent /dev/input/event1 3 53 %d", X1);
system("sendevent /dev/input/event1 3 54 %d", Y1);
//ABS_MT_PRESSURE 8정도의 값을 보내서 press 되었다고 알려 줍니다.
system("sendevent /dev/input/event1 3 58 8");
//한 pointer에 대한 EV_SYN, SYN_REPORT를 보낸다.
system("sendevent /dev/input/event3 0 0 0");


//두번째 pointer 입력 전에 ABS_MT_SLOT을 보낸다.
system("sendevent /dev/input/event3 3 47 1");


//두번째 pointer의 위치를 정한다.
X1 = X2 + 50;
Y2 = Y2 + 50;


//두번째 pointer
//첫번째 pointer의 ABS_MT_TRACKING_ID를 2로 설정한다.
system("sendevent /dev/input/event1 3 57 2");
system("sendevent /dev/input/event1 3 53 %d", X2);
system("sendevent /dev/input/event1 3 54 %d", Y2);  
system("sendevent /dev/input/event1 3 58 8");
system("sendevent /dev/input/event1 0 0 0");


//여기서 ABS_MT_POSITION_X(53), ABS_MT_POSITION_Y(54), 그리고 SYN_REPORT를 한 묶음으로 이동하고 싶은 만큼 반복한다.
system("sendevent /dev/input/event1 3 53 %d", X2 += 20);
system("sendevent /dev/input/event1 3 54 %d", Y2 += 20);
system("sendevent /dev/input/event1 0 0 0");


//첫번째 pointer의 ABS_MT_TR두ACKING_ID를 -1을 초기화 한다.
system("sendevent /dev/input/event1 3 57 -1");
system("sendevent /dev/input/event1 0 0 0");
//ABS_MT_SLOT(47)은 0,1로 번갈아 입력된다. 앞에서 1로 보냈으니 0으로 보낸다.
system("sendevent /dev/input/event1 3 47 0");
//두번째 pointer의 ABS_MT_TRACKING_ID를 -1을 초기화 한다.
system("sendevent /dev/input/event1 3 57 -1");
system("sendevent /dev/input/event1 0 0 0");

--------------------------------------------------------------------------------------------------

bionic/libc/kernel/common/linux/input.h에 define 되어 있습니다.

#define EV_ABS 0x03
#define ABS_MT_POSITION_X 0x35  -> 57(십진수)

#define ABS_MT_POSITION_Y 0x36 - > 58(십진수)
#define ABS_MT_PRESSURE 0x3a


아래와 같이 getevent -l 로 event를 확인 할 수 있는데 Multi touch시에 event가 어떻게 들어 오는지 확인하여 pinch zoom을 구현해 봤습니다.


$ adb shell getevent -l
add device 1: /dev/input/event0
  name:     "odroid-keypad"
add device 2: /dev/input/event2
  name:     "Microsoft Microsoft 3-Button Mouse with IntelliEye(TM)"
add device 3: /dev/input/event1
  name:     "odroidx-ts"
/dev/input/event2: EV_REL       REL_X                ffffffff          
/dev/input/event2: EV_REL       REL_Y                00000001          
/dev/input/event2: EV_SYN       SYN_REPORT           00000000          
/dev/input/event2: EV_REL       REL_X                ffffffff          
/dev/input/event2: EV_REL       REL_Y                00000002          
/dev/input/event2: EV_SYN       SYN_REPORT           00000000          
/dev/input/event2: EV_REL       REL_X                ffffffff          
/dev/input/event2: EV_REL       REL_Y                00000002          
/dev/input/event2: EV_SYN       SYN_REPORT           00000000          
/dev/input/event2: EV_REL       REL_X                ffffffff          
/dev/input/event2: EV_REL       REL_Y                00000002          
/dev/input/event2: EV_SYN       SYN_REPORT           00000000          
/dev/input/event2: EV_REL       REL_X                ffffffff          
/dev/input/event2: EV_REL       REL_Y                00000002          
/dev/input/event2: EV_SYN       SYN_REPORT           00000000          
/dev/input/event2: EV_REL       REL_X                ffffffff          
/dev/input/event2: EV_REL       REL_Y                00000002  


2013년 4월 15일 월요일

Recovery for ODROID

I success to port recovery function of CM to ODROID-X2 base Android beta 1.5(android-4.1.2_r1). 
well working.


now enable recovery UI on LCD.


2013년 4월 2일 화요일

CM-10.1-M2 for ODROID-U2

1. Support Ethernet. (static IP not yet)
2. Mouse right button click act like back Button.
3. add PowerOff widget.


working to enable Volume Up/Down, Screenshot, Power Button.


https://www.dropbox.com/s/sy3lkbo8fr48xla/cm-10.1-20130404-UNOFFICIAL-odroidu2.zip

build and install CyanogenMod for ODOID-U2

http://wiki.cyanogenmod.org/w/Build_for_odroidu2

소스를 git로부터 가져 옵니다.
get source from git.

$repo init -u git://github.com/CyanogenMod/android.git -b cm-10.1

$repo sync

tag를 확인해 보면 M2가 있습니다. M2로 checkout합니다.


[~/projects/cm-10.1/frameworks/base]$ git tag
cm-10.1-M1
cm-10.1-M2

$repo forall -c git chechout cm-10.1-M2

$cd vendor/cm
$./get-prebuilts
$cd ../..

$source build/envsetup.sh
$breakfast odroidu2

including vendor/cm/vendorsetup.sh
ls: cannot access device/*/odroidu2/cm.mk: No such file or directory
build/core/product_config.mk:234: *** Cannot locate config makefile for product "cm_odroidu2".  Stop.
Device odroidu2 not found. Attempting to retrieve device repository from CyanogenMod Github (http://github.com/CyanogenMod).
Found repository: android_device_hardkernel_odroidu2
Default revision: cm-10.1
Checking branch info
Adding dependency: CyanogenMod/android_device_hardkernel_odroidu2 -> device/hardkernel/odroidu2
Using default branch for android_device_hardkernel_odroidu2
Syncing repository to retrieve project.
remote: Counting objects: 338, done.
remote: Compressing objects: 100% (148/148), done.
remote: Total 338 (delta 147), reused 320 (delta 129)
Receiving objects: 100% (338/338), 2.87 MiB | 153 KiB/s, done.
Resolving deltas: 100% (147/147), done.
From git://github.com/CyanogenMod/android_device_hardkernel_odroidu2
 * [new branch]      cm-10.1    -> github/cm-10.1
 * [new tag]         cm-10.1-M2 -> cm-10.1-M2
 * [new tag]         cm-10.1-M3 -> cm-10.1-M3
 * [new tag]         cm-10.1.0-RC1 -> cm-10.1.0-RC1
 * [new tag]         cm-10.1.0-RC2 -> cm-10.1.0-RC2
 * [new tag]         cm-10.1.0-RC3 -> cm-10.1.0-RC3
 * [new tag]         cm-10.1.0-RC4 -> cm-10.1.0-RC4
 * [new tag]         cm-10.1.0-RC5 -> cm-10.1.0-RC5
From git://github.com/CyanogenMod/android_device_hardkernel_odroidu2
 * [new tag]         cm-10.1-M1 -> cm-10.1-M1
Fetching projects: 100% (1/1), done.

Repository synced!
Looking for dependencies
Adding dependencies to manifest
Adding dependency: CyanogenMod/android_device_hardkernel_samsung -> device/hardkernel/samsung
Using default branch for android_device_hardkernel_samsung
Adding dependency: CyanogenMod/android_hardware_realtek -> hardware/realtek
Using default branch for android_hardware_realtek
Adding dependency: CyanogenMod/hardkernel-kernel-4412 -> kernel/hardkernel/4412-common
Using default branch for hardkernel-kernel-4412
Syncing dependencies
remote: Counting objects: 673, done.
remote: Counting objects: 19, done.
remote: Compressing objects: 100% (15/15), done.
remote: Compressing objects: 100% (315/315), done.
remote: Total 19 (delta 0), reused 19 (delta 0)
Unpacking objects: 100% (19/19), done.
From git://github.com/CyanogenMod/android_hardware_realtek
 * [new branch]      cm-10.1    -> github/cm-10.1
 * [new tag]         cm-10.1-M1 -> cm-10.1-M1
 * [new tag]         cm-10.1-M2 -> cm-10.1-M2
 * [new tag]         cm-10.1-M3 -> cm-10.1-M3
 * [new tag]         cm-10.1.0-RC1 -> cm-10.1.0-RC1
 * [new tag]         cm-10.1.0-RC2 -> cm-10.1.0-RC2
 * [new tag]         cm-10.1.0-RC3 -> cm-10.1.0-RC3
 * [new tag]         cm-10.1.0-RC4 -> cm-10.1.0-RC4
 * [new tag]         cm-10.1.0-RC5 -> cm-10.1.0-RC5
remote: Total 673 (delta 326), reused 673 (delta 326)
Receiving objects: 100% (673/673), 3.95 MiB | 94 KiB/s, done.
Resolving deltas: 100% (326/326), done.
From git://github.com/CyanogenMod/android_device_hardkernel_samsung
 * [new branch]      cm-10.1    -> github/cm-10.1
 * [new tag]         cm-10.1-M1 -> cm-10.1-M1
 * [new tag]         cm-10.1-M2 -> cm-10.1-M2
 * [new tag]         cm-10.1-M3 -> cm-10.1-M3
 * [new tag]         cm-10.1-MR1 -> cm-10.1-MR1
 * [new tag]         cm-10.1.0-RC1 -> cm-10.1.0-RC1
 * [new tag]         cm-10.1.0-RC2 -> cm-10.1.0-RC2
 * [new tag]         cm-10.1.0-RC3 -> cm-10.1.0-RC3
 * [new tag]         cm-10.1.0-RC4 -> cm-10.1.0-RC4
 * [new tag]         cm-10.1.0-RC5 -> cm-10.1.0-RC5
remote: Counting objects: 2114829, done.
remote: Compressing objects: 100% (330292/330292), done.
Receiving objects:   2% (43873/2114829), 16.79 MiB | 131 KiB/s  


odroid-u2를 켜고 device/hardkernel/odroidu2/extract-files.sh을 실행

Turn on odroid-u2 and run shell script.

$sh ./extrac-files.sh

And build.

$source build/envsetup.sh
$breakfast odroidu2
$croot
$brunch odroidu2


http://wiki.cyanogenmod.org/w/Install_CM_for_odroidu2

여기서 CM 복구 이미지를 받습니다.
Download CM Recovery(bootstrap) Image.

http://cmw.cmfs.me/emmc/bootstrap-cm-10.1-20130105-odroidu2.zip

압축을 풀고 eMMC를 PC에 연결 합니다.
Unzip and connect eMMC Module to PC.

sh ./install-emmc.sh /dev/sd[x] 와 같이 mount된 eMMC의 sd[x]를 넣어 줍니다.


[~/Downloads/cyanogenMod]$ sh ./install-emmc.sh /dev/sdd
/dev/sdd reader is identified.
Fusing kernel
2887260+0 records in
2887260+0 records out
2887260 bytes (2.9 MB) copied, 2.15934 s, 1.3 MB/s
Fusing root filesystem
185013+0 records in
185013+0 records out
185013 bytes (185 kB) copied, 0.203257 s, 910 kB/s
Fusing main system partition
500+0 records in
500+0 records out
524288000 bytes (524 MB) copied, 37.0214 s, 14.2 MB/s


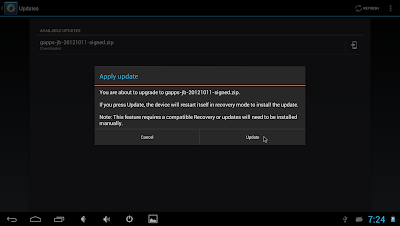
eMMC를 다시 PC에 연결 후 fat 영역에 "cmupdater" 란 폴더를 만들고 cm-10.1-xxxxxxxx-UNOFFICIAL-odroidu2.zip 앞에서 build된 zip 파일을 넣으면 아래와 같이 보이고 설치가 가능합니다.

finished fusing, reconnect eMMC module.

make directory "cmupdater" into fat partition.

copy cm-10.1-xxxxxxxx-UNOFFICIAL-odroidu2.zip.


2013년 3월 25일 월요일

GMS apps install without PC for ODROID

Connect USB Keyboard.

1. Download GAPPS from Broswer


http://goo.im/gapps/


ICS

gapps-ics-20120429-signed.zip

JB

gapps-jb-20121011-signed.zip

2. Run File Explorer


3. Unzip by File Explorer app.


4. Run Terminal 


5. get Root

#su


6. remount /system patition to rw

#mount -o rw,remount /system


root@android:/sdcard/Download # mount                                           
rootfs / rootfs ro,relatime 0 0                                                 
tmpfs /dev tmpfs rw,nosuid,relatime,mode=755 0 0                                
devpts /dev/pts devpts rw,relatime,mode=600 0 0                                 
proc /proc proc rw,relatime 0 0                                                 
sysfs /sys sysfs rw,relatime 0 0                                                
none /acct cgroup rw,relatime,cpuacct 0 0                                       
tmpfs /mnt/asec tmpfs rw,relatime,mode=755,gid=1000 0 0                         
tmpfs /mnt/obb tmpfs rw,relatime,mode=755,gid=1000 0 0                          
none /dev/cpuctl cgroup rw,relatime,cpu 0 0                                     
/dev/block/mmcblk0p2 /system ext4 rw,relatime,barrier=1,data=ordered 0 0        
/dev/block/mmcblk0p3 /data ext4 rw,nosuid,nodev,noatime,barrier=1,nodelalloc,da0
/dev/block/mmcblk0p4 /cache ext4 rw,nosuid,nodev,noatime,barrier=1,nomblk_io_su0
none /proc/bus/usb usbfs rw,relatime,devmode=666 0 0                            
/dev/block/vold/179:1 /mnt/sdcard vfat rw,dirsync,nosuid,nodev,noexec,relatime,0
/dev/block/vold/179:1 /mnt/secure/asec vfat rw,dirsync,nosuid,nodev,noexec,rela0
tmpfs /mnt/sdcard/.android_secure tmpfs ro,relatime,size=0k,mode=000 0 0        
root@android:/sdcard/Download # 

7. cp gapps files


/system/bin/busybox cp -rv /sdcard/Download/gapp-jb-20121011-signed/system/* /system/


8. change permissions


#cd /system/app
#chmod 644 *
#sync
#reboot

9. finish


2013년 1월 28일 월요일

Makefile에서 "-=" 문제

android 4.1.1에서 busybox가 컴파일이 안된다.
문제는 -fno-strict-volatile-bitfields다.
4.2.1에서는 컴파일이 되는데 4.1.1에서는 안된다.

build/core/combo/TARGET_linux-arm.mk


120 # by turning off the builtin sin function.                          
121 ifneq ($(filter 4.6.%, $(shell $(TARGET_CC) --version)),)          
122 TARGET_GLOBAL_CFLAGS += -Wno-unused-but-set-variable -fno-builtin-sin \
123             -fno-strict-volatile-bitfields                                                          
124 endif                                                                  
125        


그래서 저 옵션만 끄면 되것 같아서 아래와 같이 해 보았다.

TARGET_GLOBAL_CFLAGS -= -fno-strict-volatile-bitfields

물론 -=가 될줄 알았는데 안된다.

그래서 할 수 없이 TARGET_GLOBAL_CFLAGS에서 -fno-strict-volatile-bitfields를 없애고 다른 변수를 선언하기로 했다.

TARGET_GLOBAL_CFLAGS2 := $(shell echo $(TARGET_GLOBAL_CFLAGS) | sed 's/-fno-strict-volatile-bitfields/ /g')

2012년 10월 18일 목요일

Navigation Bar에 volume up/down, Shutdown, Screenshot 버튼 넣어보기


Tablet UI에서 back, home. recent app 옆에  volume up/down, Shutdown, Screenshot button을 넣어보자.

먼저 frameworks/base/packages/SystemUI/res/drawable-[h,m,x]dpi/에
ic_sysbar_home.png와 동일한 크기의 
ic_sysbar_plus,png, ic_sysbar_minus.png, ic_sysbar_shutdown.png, ic_sysbar_screenshot.png 이란 이미지를 준비합니다.

frameworks/base/packages/SystemUI/res/layout/navigation_bar.xml 에 recent_apps 다음에 4개의 항목을 추가합니다.

 <com.android.systemui.statusbar.policy.KeyButtonView android:id="@+id/recent_apps"
                android:layout_width="80dp"
                android:layout_height="match_parent"
                android:src="@drawable/ic_sysbar_recent"
                android:layout_weight="0"
                systemui:glowBackground="@drawable/ic_sysbar_highlight"
                android:contentDescription="@string/accessibility_recent"
                />
            <com.android.systemui.statusbar.policy.KeyButtonView android:id="@+id/vol_plus"
                android:layout_width="80dp"
                android:layout_height="match_parent"
                android:src="@drawable/ic_sysbar_plus"
                android:layout_weight="0"
                systemui:glowBackground="@drawable/ic_sysbar_highlight"
                android:contentDescription="@string/accessibility_recent"
                />
            <com.android.systemui.statusbar.policy.KeyButtonView android:id="@+id/vol_minus"
                android:layout_width="80dp"
                android:layout_height="match_parent"
                android:src="@drawable/ic_sysbar_minus"
                android:layout_weight="0"
                systemui:glowBackground="@drawable/ic_sysbar_highlight"
                android:contentDescription="@string/accessibility_recent"
                />
            <com.android.systemui.statusbar.policy.KeyButtonView android:id="@+id/shutdown"
                android:layout_width="80dp"
                android:layout_height="match_parent"
                android:src="@drawable/ic_sysbar_shutdown"
                android:layout_weight="0"
                systemui:glowBackground="@drawable/ic_sysbar_highlight"
                android:contentDescription="@string/accessibility_recent"
                />
            <com.android.systemui.statusbar.policy.KeyButtonView android:id="@+id/screenshot"
                android:layout_width="80dp"
                android:layout_height="match_parent"
                android:src="@drawable/ic_sysbar_screenshot"
                android:layout_weight="0"
                systemui:glowBackground="@drawable/ic_sysbar_highlight"
                android:contentDescription="@string/accessibility_recent"
                />

frameworks/base/packages/SystemUI/res/layout-sw600dp/status_bar.xml도 동일하게 수정 합니다.

frameworks/base/packages/SystemUI/src/com/android/systemui/statusbar/tablet/TabletStatusBar.java 에서 volume up/down과 shutdown을 구현합니다.


//volume control
import android.media.AudioManager;
//shutdown
import com.android.internal.app.ShutdownThread;
//screenshot
import android.content.ComponentName;
import android.content.ServiceConnection;
import android.os.Messenger;


    ImageView mBackButton;
    View mHomeButton;
    View mMenuButton;
    View mRecentButton;
//버튼 3개 추가
    View mVolPlusButton;
    View mVolMinusButton;
    View mShutdownButton;
    View mScreenshotButton;

    ViewGroup mFeedbackIconArea; // notification icons, IME icon, compat icon
    InputMethodButton mInputMethodSwitchButton;
    CompatModeButton mCompatModeButton;


    // used to notify status bar for suppressing notification LED
    private boolean mPanelSlightlyVisible;

AudioManager mAudioManager;

    public Context getContext() { return mContext; }


        mMenuButton = mNavigationArea.findViewById(R.id.menu);
        mRecentButton = mNavigationArea.findViewById(R.id.recent_apps);
        mRecentButton.setOnClickListener(mOnClickListener);
mVolPlusButton = mNavigationArea.findViewById(R.id.vol_plus);
        mVolPlusButton.setOnClickListener(mOnClickListener);
mVolMinusButton = mNavigationArea.findViewById(R.id.vol_minus);
        mVolMinusButton.setOnClickListener(mOnClickListener);
mShutdownButton = mNavigationArea.findViewById(R.id.shutdown);
        mShutdownButton.setOnClickListener(mOnClickListener);

mScreenshotButton = mNavigationArea.findViewById(R.id.screenshot);
        mScreenshotButton.setOnClickListener(mOnClickListener);

        LayoutTransition lt = new LayoutTransition();


        mHomeButton.setVisibility(disableHome ? View.INVISIBLE : View.VISIBLE);
        mRecentButton.setVisibility(disableRecent ? View.INVISIBLE : View.VISIBLE);
        mVolPlusButton.setVisibility(disableRecent ? View.INVISIBLE : View.VISIBLE);
        mVolMinusButton.setVisibility(disableRecent ? View.INVISIBLE : View.VISIBLE);
        mShutdownButton.setVisibility(disableRecent ? View.INVISIBLE : View.VISIBLE);
        mScreenshotButton.setVisibility(disableRecent ? View.INVISIBLE : View.VISIBLE);

        mInputMethodSwitchButton.setScreenLocked(
                (visibility & StatusBarManager.DISABLE_SYSTEM_INFO) != 0);


    private View.OnClickListener mOnClickListener = new View.OnClickListener() {
        public void onClick(View v) {
if (mAudioManager == null)
mAudioManager = (AudioManager)getContext().getSystemService(Context.AUDIO_SERVICE);
            if (v == mRecentButton) {
                onClickRecentButton();
            } else if (v == mInputMethodSwitchButton) {
                onClickInputMethodSwitchButton();
            } else if (v == mCompatModeButton) {
                onClickCompatModeButton();
            } else if (v == mVolPlusButton) {
mAudioManager.handleKeyDown(KeyEvent.KEYCODE_VOLUME_DOWN, AudioManager.STREAM_MUSIC);
} else if (v == mVolMinusButton) {
mAudioManager.handleKeyDown(KeyEvent.KEYCODE_VOLUME_UP, AudioManager.STREAM_MUSIC);
} else if (v == mShutdownButton) {
ShutdownThread.shutdown(mContext,true);
}

} else if (v == mScreenshotButton) {
takeScreenshot(); 
}
        }
    };

final Object mScreenshotLock = new Object();
    ServiceConnection mScreenshotConnection = null;

    final Runnable mScreenshotTimeout = new Runnable() {
        @Override public void run() {
            synchronized (mScreenshotLock) {
                if (mScreenshotConnection != null) {
                    mContext.unbindService(mScreenshotConnection);
                    mScreenshotConnection = null;
                }
            }
        }
    };

    // Assume this is called from the Handler thread.
    private void takeScreenshot() {
        synchronized (mScreenshotLock) {
            if (mScreenshotConnection != null) {
                return;
            }
            ComponentName cn = new ComponentName("com.android.systemui",
                    "com.android.systemui.screenshot.TakeScreenshotService");
            Intent intent = new Intent();
            intent.setComponent(cn);
            ServiceConnection conn = new ServiceConnection() {
                @Override
                public void onServiceConnected(ComponentName name, IBinder service) {
                    synchronized (mScreenshotLock) {
                        if (mScreenshotConnection != this) {
                            return;
                        }
                        Messenger messenger = new Messenger(service);
                        Message msg = Message.obtain(null, 1);
                        final ServiceConnection myConn = this;
                        Handler h = new Handler(mHandler.getLooper()) {
                            @Override
                            public void handleMessage(Message msg) {
                                synchronized (mScreenshotLock) {
                                    if (mScreenshotConnection == myConn) {
                                        mContext.unbindService(mScreenshotConnection);
                                        mScreenshotConnection = null;
                                        mHandler.removeCallbacks(mScreenshotTimeout);
                                    }
                                }
                            }
                        };
                        msg.replyTo = new Messenger(h);
                        msg.arg1 = msg.arg2 = 0;
                        //if (mStatusBar != null && mStatusBar.isVisibleLw())
                            msg.arg1 = 1;
                        //if (mNavigationBar != null && mNavigationBar.isVisibleLw())
                            msg.arg2 = 1;
                        try {
                            messenger.send(msg);
                        } catch (RemoteException e) {
                        }
                    }
                }
                @Override
                public void onServiceDisconnected(ComponentName name) {}
            };
            if (mContext.bindService(intent, conn, Context.BIND_AUTO_CREATE)) {
                mScreenshotConnection = conn;
                mHandler.postDelayed(mScreenshotTimeout, 10000);
            }
        }

    }

2012년 10월 17일 수요일

자동으로 Wi-Fi on/off하기

무제한 요금제를 사용하지만 Wi-Fi의 환경이 더 빠르기 때문에 사무실이나 집에서 전원을 연결하고 Wi-Fi를 사용합니다.
그리고 이동 중에는 Wi-Fi를 off합니다.
그래서 자동으로 충전 중이면 Wi-Fi를 켜주고 충전이 아니면 Wi-Fi를 끄는 app을 만들어 봤습니다.

추가적으로 빈 Activity에 사용여부 확인 가능한 checkbox를 추가하였습니다.


http://dl.dropbox.com/u/4485660/WiFiAuto.apk

아주 간단한 프로그램인데 BroadcastReceiver 상속받은 class만으로 app을 만들어 보니 ACTION_POWER_CONNECT intent를 못 받아서 삽질 좀 했네요.
그래서 아무 동작하지 않는 Activity를 추가 하였습니다.


--- ACConnectReceiver.java ---


package com.hardkernel.odroid.wifiauto;

import android.content.BroadcastReceiver;
import android.content.Context;
import android.content.Intent;
import android.net.wifi.WifiManager;

public class ACConnectReceiver extends BroadcastReceiver {

@Override
public void onReceive(Context context, Intent intent) {
// TODO Auto-generated method stub
String action = intent.getAction();
WifiManager manager = (WifiManager) context.getSystemService(Context.WIFI_SERVICE);
if (action.equals(Intent.ACTION_POWER_CONNECTED)) {
manager.setWifiEnabled(true);
} else if (action.equals(Intent.ACTION_POWER_DISCONNECTED)) {
manager.setWifiEnabled(false);
}
}

}


--- MainActivity.java ---


package com.hardkernel.odroid.wifiauto;

import android.app.Activity;
import android.content.SharedPreferences;
import android.os.Bundle;
import android.widget.CheckBox;
import android.widget.CompoundButton;
import android.widget.CompoundButton.OnCheckedChangeListener;

public class MainActivity extends Activity {

@Override
protected void onCreate(Bundle savedInstanceState) {
// TODO Auto-generated method stub
super.onCreate(savedInstanceState);

setContentView(R.layout.main_layout);

CheckBox cbUse = (CheckBox)findViewById(R.id.cb_use);
cbUse.setOnCheckedChangeListener(new OnCheckedChangeListener () {

@Override
public void onCheckedChanged(CompoundButton buttonView,
boolean isChecked) {
// TODO Auto-generated method stub
SharedPreferences prefs = getSharedPreferences("PreName", MODE_PRIVATE);
SharedPreferences.Editor editor = prefs.edit();
editor.putBoolean("Use", isChecked);
editor.commit();
}

});

SharedPreferences prefs = getSharedPreferences("PreName", MODE_PRIVATE);
cbUse.setChecked(prefs.getBoolean("Use", true));
}

}


--- AndroidManifest.xml ---


<manifest xmlns:android="http://schemas.android.com/apk/res/android"
    package="com.hardkernel.odroid.wifiauto"
    android:versionCode="1"
    android:versionName="1.0"
    android:installLocation="internalOnly">

    <uses-sdk android:minSdkVersion="10" />
 
    <uses-feature android:name="android.hardware.wifi" />
    <uses-permission android:name="android.permission.CHANGE_WIFI_STATE" />
    <uses-permission android:name="android.permission.DEVICE_POWER"/>

    <application android:label="@string/app_name"
        android:icon="@drawable/ic_launcher"
        android:theme="@style/AppTheme">
             
        <activity
            android:label="@string/app_name"
            android:name=".MainActivity" >  
            <intent-filter>
              <action android:name="android.intent.action.MAIN" />
              <category android:name="android.intent.category.LAUNCHER" />
            </intent-filter>
        </activity>
     
        <receiver
            android:name=".ACConnectReceiver" >
            <intent-filter>
                <action android:name="android.intent.action.ACTION_POWER_CONNECTED"/>
                <action android:name="android.intent.action.ACTION_POWER_DISCONNECTED"/>
            </intent-filter> 
        </receiver>

    </application>

</manifest>


2012년 9월 18일 화요일

sun-java6-jdk deb 직접 만들어 사용하기

synaptic에서 더 이상 sun-java6-jdk package를 설치 할 수 없습니다.
그래서 직접 만들어 사용하는 방법이 있어서 소개 합니다.

http://blog.flexion.org/2012/01/16/install-sun-java-6-jre-jdk-from-deb-packages/

위에 페이지에서 git 주소가 있습니다.

https://github.com/flexiondotorg/oab-java6

git로 부터 소스를 받습니다.

$mkdir sun-java
$cd sun-java
$git clone git://githbu.com/rraptorr/sun-java6.git
$cd sun-java6
$sudo apt-get install dpkg-dev

현재 폴더에서 jdk-6u35-linux-i586.bin과 jdk-6u35-x64.bin 두 파일을 아래 사이트에서 받습니다.

http://www.oracle.com/technetwork/java/javase/downloads/jdk6u35-downloads-1836443.html

그리고 jce_policy-6.zip을 아래 사이트에서 받습니다.
http://www.oracle.com/technetwork/java/javase/downloads/jce-6-download-429243.html

$dpkg-buildpackage -uc -us

몇몇 패키지가 없다고 에러가 나면 설치하고 계속 진행합니다.
성공하고 상위 폴더로 이동하면 deb 파일들이 보입니다.

먼저 java-common을 설치하여 주시고 패키지 의존성에 맞게 순서대로 설치 하시면 됩니다.